

About [**Note - 20/8/2014 Awaiting video publishing so please hold on]
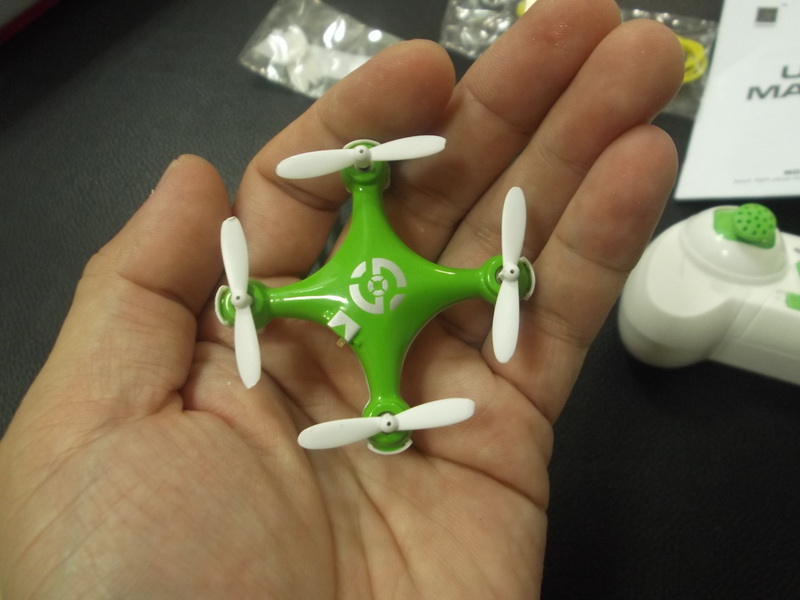
 Our sponsor BANGGOOD.COM sends me the Cheerson CX-10 nano quad as a project material to convert it into an FPV platform. By that time it was consider the smallest quad was priced at USD$18.99 in August 2014, the cheapest affordable nano quad around with nifty feature for beginners and indoor flying enthusiast. Before I begin my project I took some time to play around VLOS (Visual Line Of Sight) flight like any normal people does indoor, I realized its extremely stable thanks to its 6 axis gyro which I believe anyone without flying skills can fly it without a hassle. The bright pair of blue and red led helps the orientation view and will blink if the battery runs out. It is extremely small once it goes beyond 10 meter sight, once crash around the furniture will take minutes to find especially if the propellers pop-off. A sweep of broom stick will help out tracking down those tiny props. Stock flight time is around 5 minutes, charge time via your PC USB port will takes around 25~30 minutes. You’ll need 2x AAA battery for the controller and you’re ready to fly.
I’ve seen one guy on youtube flown a similar size nano quad which I believe was ESTES PROTO-X modded into FPV but didn’t show a full flight length and  the pricing for PROTO-X was quite expensive for moddings and structurally not as beefy as the CX-10 because of thin arm holding the motor. So I took some my chances converting the CX-10 into FPV capable flight just to experimenting or to prove the concept of nano FPV flight.
Before CX-10 arrived into my hands I can see it has a potential to become an indoor FPV nano platform because of several factor:
- It have lots of plastic covering all over the frame, stripping all off should able to carry another extra 2.5grams “in stocked weight”. (Stripped CM205 wireless camera worth 2.8grams)
- 6 axis gyro. Helps balance all around.
- Cheap enough to bash and make mistakes without feeling guilty about the pricing.
Model specification & setup
-
Item name: Cheerson CX-10 Mini RC Quadcopter
-
Frequency: 2.4Ghz
-
Gyro: 6 axis
-
Material: ABS
-
Size: 40 x 40 x 22mm
-
 Flight time: about 5-8 minutes
 -
Charging time: 30 minutes
-
Control distance: about 20-50M
-
Battery for quadcopter: 3.7V 100mah
-
Channel control: 4 channel mini rolling quadcopter
-
Launching: Throw to fly,real 6 axis gyro to stabilized it
-
Flight action: Up/down/left/right/side flight/hover/flip / hand launch
-
Speed: 3 flight speed mode
-
LVC: Low voltage alarm via LED light for night flight
Stock packages included:
-
1 x Cheerson CX-10 Mini RC Quadcopter
-
1 x 2.4G transmitter
-
1 x USB charging cable
-
2 x spare blades

My DIY FPV specification
- Item name: BOSCAM CM205 wireless camera
- Frequency: 5.8GHz
- RF Power: 10 milliwatt
- Camera: CMOS, 330 TVL
- Lens: Pinhole lens, 55° Horizontal View
- Video Type: Composite NTSC or PAL (user switchable)
- Audio: Mono, built-in microphone (removed for weight reduction)
- Antenna: Integrated monopole whip
- Range: 100 meters maximum (unobstructed open area)
- Voltage: ~3.3V
- Current: 200mA typical
- Stripped weight: 2.48 grams
Building
Converting CX-10 into FPV is harder than it looks because mostly it’s all about the weight. Stock CX-10 can carry its own weight at max 13.8 gram only without “fighting” for control. Overweight causes it to veer out of control  and slump to the ground. I had to remove almost anything that is possible on both quad and the FPV gear itself to about 13.8gram to make it flyable and enough runtime to satisfy FPV flight enjoyment indoors.
Here are list of parts removed from the quad:
- Upper plastic case and 4x case screw.
- Lower plastic case remove and the motor lower case are cut and placed back into the motor as landing gear stilt.
- Main lipo battery transferred to upper deck to allow heavy parts such as CM205 camera to place under for better CG and FPV visual.
- CX-10 onboard charging 2 pin port have been removed clean from the board.
- Main lipo battery stripped, removing a small PCB and resolder the black and red wire back to corresponding terminal to reduce weight. Charging only possible using “Alligator clip” clipped directly to the battery terminal surface since the main charging port have been removed. The PCB probably used to avoid lipo from over discharged or something.
- 4x quad motors position shifted slightly up to allow prop clearance against the upper deck main lipo battery. Then light epoxy to keep them in place rigidly.
- 4x quad motors wire are trimmed short to reduce weight.
Total flying weight after full stripping was around 10 grams.
Here are list of parts removed from CM205 wireless camera:
- Remove the main plastic case.
- Remove “Female” 5v plug (it has built-in stepdown regulator.
- Nano size mic removed to save weight.
- Channel “Dip Switch” removed to save weight. Thing lightweight wires are used instead as switches.
- Any protruded component legs from factory soldering are cut trimmed to save weight.
Total weight of CM205 camera after stripping was 2.4grams.
 CM205 camera originally required to be powered from 5V outlet. However it can be powered directly from 3.7v lipo pack once its fully stripped from its main “female” plug. The bulky “female” plug contain built-in 5v to 3.3v step-down regulator that is not needed for this project which can be easily cut –off by cutting the wires to separate from CM205. De-case the CM205 and you will find dual boards with small camera exposed.
CM205 wireless camera battery powered from separate battery pack but according to the manual it required to be powered 200mah 1s power. So the only battery I could find is from my mini toy 1s 100mah lipo which weighted at 2 grams.
Both camera and lipo place under the belly of the quad side by side which ended with camera slightly placed off-set to the left rather than center. The rotor landing gear provides clearance and protect the equipment being squashed during landing. The final total flying weight after the build was 14.98gram..ouch! too far from tolerable 13.8gram limit but it few ok with reduced runtime.
 The final production of this FPV CX-10 looks extremely crude because its all cellotaped to hold the main FPV (CM205 camera) parts and lipo pack around as cheaper alternative for lightweight holder and doesn’t have room to make it look perfect due to nano size….but hey what matter the most that it works great.
FPV building level difficulty/rating:/em> Medium (10/10)
FPV equipment setup grade:/em> Basic
Building hours required: 8 hours
Skill required:/em> Soldering
Critical issues during installation: Micro/fine soldering
RRequired additional mods/must do improvement: Full flying weight never exceed 15gram.
FPV flight characteristic and performance 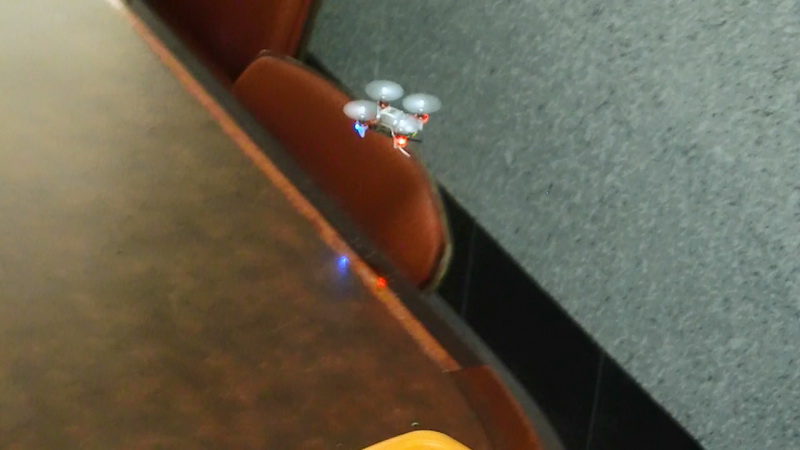 On stock CX-10 it actually fun to fly indoor, very stable and feels “locked” . The blue and red LED lights work well to assist visual orientation. Upon having converted into FPV capable flight the CX-10 gain extra weight and reduce the flight-time slightly but still able to with decent flight time to enjoy nano FPV experience inside home or in the office. The view is slightly narrow than any other FPV camera I use so due to the fact that stock lens has 55 degree FOV angle on CM205.
During the flight the CX-10 slightly banking to the right and back due to CG but got all back to normal after some trimming on the control. The flight time was between 1~2 minutes un like stock 5 minutes due to its FPV weight, just good enough to prove the concept of super nano drone flight via wireless camera. The FPV camera with live view from my ground station LCD screen, BOSCAM Pocket DVR 5.8ghz and GS920 BOSCAM goggle looks great. I flew around for around 50 meters but the battery ended too soon. I wish I could find a smaller lightweight battery for it but due to budget I guess I’ll improve its performance once Nano commercial technology improves further.
 However it was proven great as concept ideas that nano quad can FPV. Thus indeed proven possibility to be the World smallest civilian FPV quad known based on its current build date.
This platform isn’t ideally design for slightly windy outdoors flight so highly avoid at any cost unless you like to hang round all day scouring around the grass looking for this tiny little quad.
For experience FPV flyer this tiny quad is a great fun to have in the pocket and enjoy challenging obstacle flight around the furniture, beginners may as well benefit a lot too but try to avoid hitting the wall and etc. to reduce weightily fix.
Minimum level of flight experience required/flight-hours: Beginner(30 min/easy)
Nature of platform handling experience/skill required: Helicopter
Self leveling capability in thumbs-off stick situation: Yes
Take-off & landing difficulty: Easy
Hand launch: Yes
Max speed: -
Min speed before stall: Not applicable
FPV flight/radius: 20~50m
Max altitude: -
FPV safe distance range for testing: 20~50m (Indoor)
Flight time: 1~3 min
 Safety issue
It doesn't have a proppeller guard so the small props would likely to hit something and pop-off during impact. The proppellers are so small hardly able to see with naked eyes againts bright colored floor. So far the prop rotation hardly able to hurt anyone since it was made from soft flexy rubber material but caution needed not to fly near your/people face or any nearby living things. Prohibited from flying outdoor to avoid losing inside thick grasses.
Pros and Cons
Pros:
- Ultra small and portable. You can easily store anywhere and looks good on the table with lights.
- Fun indoor flight and entertaining
- Amaze the crowds.
Cons:
- With everything stripped to bare board charging only possible via direct to lipo battery terminal using “Alligator clip”. Careful not to “short” during charging.
- Very hard to find/located if crashed on grass or even on plain soil due to its nano size.
- Brittle and not so durable after fitted with FPV, fragile because of exposed/stripped down components means less protection and support.
- Propeller easily loose if crashed, hard to find even on plain ground.
Current status & flight history
The nano quad was build for experimental purposes, so its short lived just to test our curiosity for Nano sized FPV flight. It flew, works great  for its purposes and designed to be indoor. Didn't expected to flew beyond 3 minutes unlike stock 5 minutes but it does awesomely prove FPV works well indeed. If we could find a lipo 100mah 1s lipo pack under worth under 1.5gram then 5 minutes flight and beyond for indoor would be a golden moments. We need solve the heavy bogging 2 gram lipo pack for now. After the test i expect to transfer all those CX-10 FPV guts into SYMA X-4 soon.
Lifespan operation:/em> 2 hours
Maintenance priority check:/em> None
Constant critical issue: Short runtime in FPV mode
Maintenance cost per-lifespan: /em>NNone
Best L.O.S distance record:/em> 50m
Est. distance covered per-lifespan: -
Best height record: -
Best flight time record per-session: 3min (100mah 1s)
Activity status:/em> Retired (Experimental purposes)
Summary
 Overall it was proven fun to build and exciting way to experimenting/discovering the possibility of nano FPV flying. It works, flew great for a nano cubic size and impressed
  ourself for having the world smallest FPV quad (homebuild/civilian grade) in our hands even it just flew between 1~3 minutes. Heavy lipo battery pack was an issue but as lipo technology improves through time or maybe if we could find 100mah 1s lipo weight below 1.5 gram in the market this tiny dude will sure grace beyond expected performance. Nano drone is the future.
I would like to thanks our sponsors again BANGGOOD.COM for sponsoring this project and have been providing quick support and services too. Thumbs up.
Cheers.
Videos/Medias![]() Here are some of my video and gallery related to the above topics:
Here are some of my video and gallery related to the above topics:
- Gallery: CX-10 nano FPV
- My Youtube channel: 3DXL
- My Videos:
- Word smallest FPV quadcopter - Cheerson CX-10 [20/8/2014 In-progress/Waiting for spare VTX lipo.]
Shopping list
HHere i've listed some raw material, hardware and stuff where you can start building your own FPV platform. The list contain the above hardware and also include some compatible ones which you can pickup what suits best for your need and your budget. So come dig around and start your tech flying ambition:
- Platform/Airframe:
- Camera/HD/DVR:
- Video receiver
- BOSCAM 5.8ghz nano receiver module (Excellent for DIY FPF goggle and mini monitor)
- BOSCAM AIO FPV video goggle GS920 with receiver 2.4ghz/5.8ghz (Excellent for serious FPV flyer)
- BOSCAM AIO FPV video goggle GS922 with diversified receiver and built-in DVR
- SKYZONE SKY-01 FPV video goggle with receiver 5.8ghz diversity antenna build-in (Excellent for serious FPV flyer)
- SKYZONE SKY-700D FPV 5.8ghz 32ch monitor + DVR (Excellent for starter and complete DVR combo)
- SKYZONE RC702 SKY-702 5.8ghz 7" AIO diversity receiver monitor
- FPV 7" TFT LCD monitor 800x480 screen with audio (Excellent for budget beginner DIY FPV build)
- Battery:
- Proppellers and motors:
Building threads/Referal
If you don't know where to begin with i recommend you to start reading some guides, wikis and building tips from popular online resources as  listed below. You might find me hanging around some popular R/C and FPV forum below.
- CHEERSON CX-10 discussion group at rcgroups.com
- CHEERSON CX-10 topic at Banggood.com forum
- Rcgroups FPV forum/
- Rcgroups Multirotor forum
- http://www.rcgroups.com
- http://www.fpvlab.com
- http://www.diydrones.com
- http://www.rcuniverse.com
- http://www.flitetest.com
- http://fpv-forum.com
- http://www.rcexplorer.se
Related topic or hardware build dependency
BBelow are related topic that are dependent on this flight platform operation, you might need to have a look at to get a complete idea how things FPV works.