
*Note: This 3d printed kit fit nicely on 1:24 scale R/C model especially on 1:24 scale SUBOTECH CoCo 4WD chassis with slight modification to electronics placement and shock mount, but if you need to fit into other 1:24 scale R/C model  chassis or nearest size you will need to manually re-scale/resize the *.STL parts before printing and also the decals that comes with the package.
*Credits: The TAMIYA branding and all the replica TAMIYA Plastic models shown here are copyright of TAMIYA CORPORATION, you may download and use it freely for your own recreational use and for non-profit/non-commercial use. Re-selling/sale/commercial distribution on this "3d printed parts and *.STL" are prohibited.
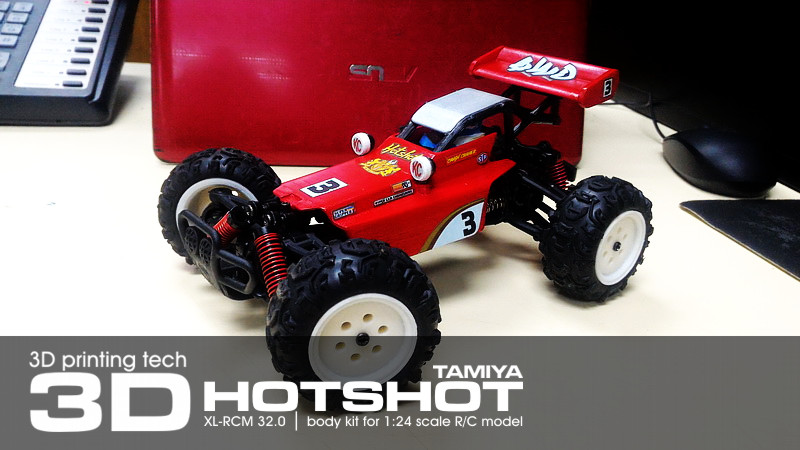
ABOUT: The HOTSHOT
My first love with Radio Control buggy was around the year 1986 when i first time saw some adults playing the TAMIYA R/C model the "HOTSHOT" cruising along the sandy beach as i walk with my family for a stroll. I was about 9 years old back then when i saw it dash around the sand. Its long slender dune buggy body build for whipping around sandy trails and jumping around bumpy terrains revealing its active suspension system keeping me trance. I really admire the exo-skeletal like construction of its body and over engineering mechanical moving parts that builds up the model. It was the most ultimate hobby machine for both young and 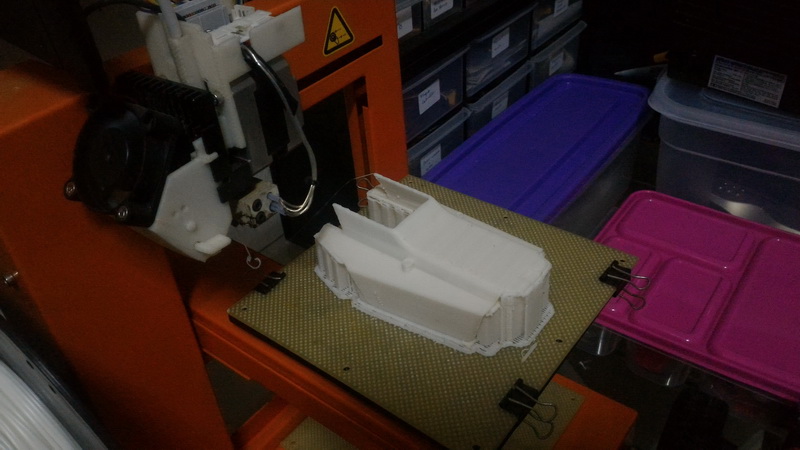 older adults, the box art also very tempting too. Back in the 80's almost every corner of the hobby store have these dune like buggy ranging models from KYOSHO's JAVELIN/OPTIMA, MARUI's SAMURAI and of-course the TAMIYA HOTSHOT. Price wise it was far for me to have own as i was born in low income family back then, it was luxury item for those who can afford it. Of-course there was then my uncle had an original first edition TAMIYA WILD WILLY grazing down the house while i drool looking upon it as it wheelie all the way on 2 wheels. HOTSHOT was my ultimate must have hobby toys but my pocket doesn't answer well.
31 years later to present day , TAMIYA re-release the 1:10 scale HOTSHOT minus the original sponsored decals yet come with improved to day drivetrains and durable plastics. Of course i did bought the WILD WILLY 2 at the end to present day. However i decided to save up my money (because i have to save up fund for other flying model projects) and decided to replicate it into 3D model and 3D print it to fit into existing yet compatible mini R/c1:24 scale 4wd chassis from SUBOTECH CoCo model. After one month of effort modelling, printing, painting and decal work the first 3D printed 1:24 scale replica of TAMIYA HOTSHOT was born. It was awesome to see my childhood nostalgia came back alive after 31 years of waiting.

Specification & requirements:
 You will need to have a 1:24 scale SUBOTECH CoCO 4WD chassis/RTR (Ready To Run) package.
- You will need Inkjet color printed to print the decals on A4 size paper without need to re-scale/resize.
- High resolution printing with 0.2 or less nozzle and full inner filling desity or max layer required to print the parts. Parts that i printed is on ABS material.
- You will need to prepare various grid of sanding paper to smoothen the surface of 3D printed parts.
- For painting you will need to have TAMIYA acrylic/spray to paint the models to actual replica.
Complete assembly parts:

Blow-out parts:

How to:
Fitting the electronics into the frame will need a lot of work and bunch of fine soldering skills especially for power wiring connected to ESC and brushless motor. Because its so compact you will need to remove any plugs, surplus wirings and etc if necessary to get it fit perfectly
- SUBOTECH Onboard integrated electronics bulk plastic case box need to be remove to expose bare electronics PCB board to allow more compact fitting under the 3D printed body.
- Front suspension shock mount/tower mount need to be remove and the top shocks eyelet shifted to lower position and screw in place where the shock mount lower based was screwed in.
- SUBOTECH stock rubber tyres need to be carefully peel off from its wheels, the tyres will be mounted on newly 3d printed wheels.
- The downloaded package already included re-size decals for A4 size colored printing, you can print directly without
 needed to re-scale during printing.
 - Some parts assembly need to be snap-in and glued together.
- To attached the completed 3d printed body/parts onto the R/C models chassis you may need to DIY or improvise self create solution to do it. You can either fit it together using sticky 3M double sided tape under the body, fabric Velcro, using magnet post mount or using back traditional snap pin to the body post mount which required to drill a hole on the 3d printed body..its all up to you to think about how to mount it especially when mounting on other type of chassis other than on SUBOTECH CoCo model.
- Unlike other similar build such as the later TAMIYA replica 3d printed build after this which is the BOOMERANG and BIGWIG this HOTSHOT required extremely compact 'flat' chassis layout to fit the body. So the SUBOTECH integrated R/C electronic board are place on the side of the 1S battery bay while the opposite side are use to accomodate DIY spacing for 2s Li-po mods to compensate lack of 1s Li-on battey on the opposing side of the chassis.
![]() Gallery |
Gallery | ![]() Download STL file for 3D printing (Already include printing decals sheet)
Download STL file for 3D printing (Already include printing decals sheet)

Your shopping list to buy parts to build the above model:
* You can also use other type of 1:24 scale R/C chassis as long you can manual scale or resize the parts accordingly.
1:24 SUBOTECH CoCo 4WD RTR package:
- Seller Banggood.com: SUBOTECH NO.BG1510C 1/24
 2.4GHz High Speed 4WD Off Road Racer
 - Seller Banggood.com: SUBOTECH NO.BG1510D 1/24 2.4GHz High Speed 4WD Off Road Racer
- Seller Banggood.com: SUBOTECH BG1510B 1/24 2.4GHz Full Scale High Speed 4WD Off Road Racer
- Seller Banggood.com: SUBOTECH BG1510A 1:24 2.4GHz Full Scale High Speed 4WD Off Road Racer
Support and references:
Community support/Review article about 1:24 scale SUBOTECH CoCo and also other references.
- Topic: SUBOTECH CoCo 1/24 and scale kit modifications
- Review article: SUBOTECH CoCo 4WD 1:24 scale truck
- TAMIYA model data: TAMIYA HOTSHOT (1985)
